Help with eNav Trainer
These notes outline how to set up eNav Trainer in your computer, with links to more details on individual steps. To learn how the eNav Trainer can help you with navigation training see
How to Master Electronic Chart Navigation with the Starpath eNav Trainer.
CONTENTS
System Requirements
Getting StartedSettings: Vessel Assignment Page 1 of 4
Settings: AIS Set-up, Page 2 of 4
Settings: Current and Wind, Page 3 of 4
Settings: Initial Location, Page 4 of 4Setup Network Connection
Vessel Control Panel
Settings: Initial Location, Page 4 of 4
Anchored or Moored Status
Making the Network Connection in your ECS
Displaying the Vessel Control Panel
Troubleshooting
System Requirements [↑]
To use this simulation service you will need an electronic navigation system (ECS), which means a navigation software program running in either a Mac or PC computer that can accept network connections by TCP. Most modern navigation software have this option. An Internet connection is required whenever you want to activate the simulation. You will need echarts for the waters you wish to sail in. US echarts are free downloads, see: starpath.com/getcharts. If you do not have an ECS, you can practice with the free OpenCPN program.
Getting Started [↑]
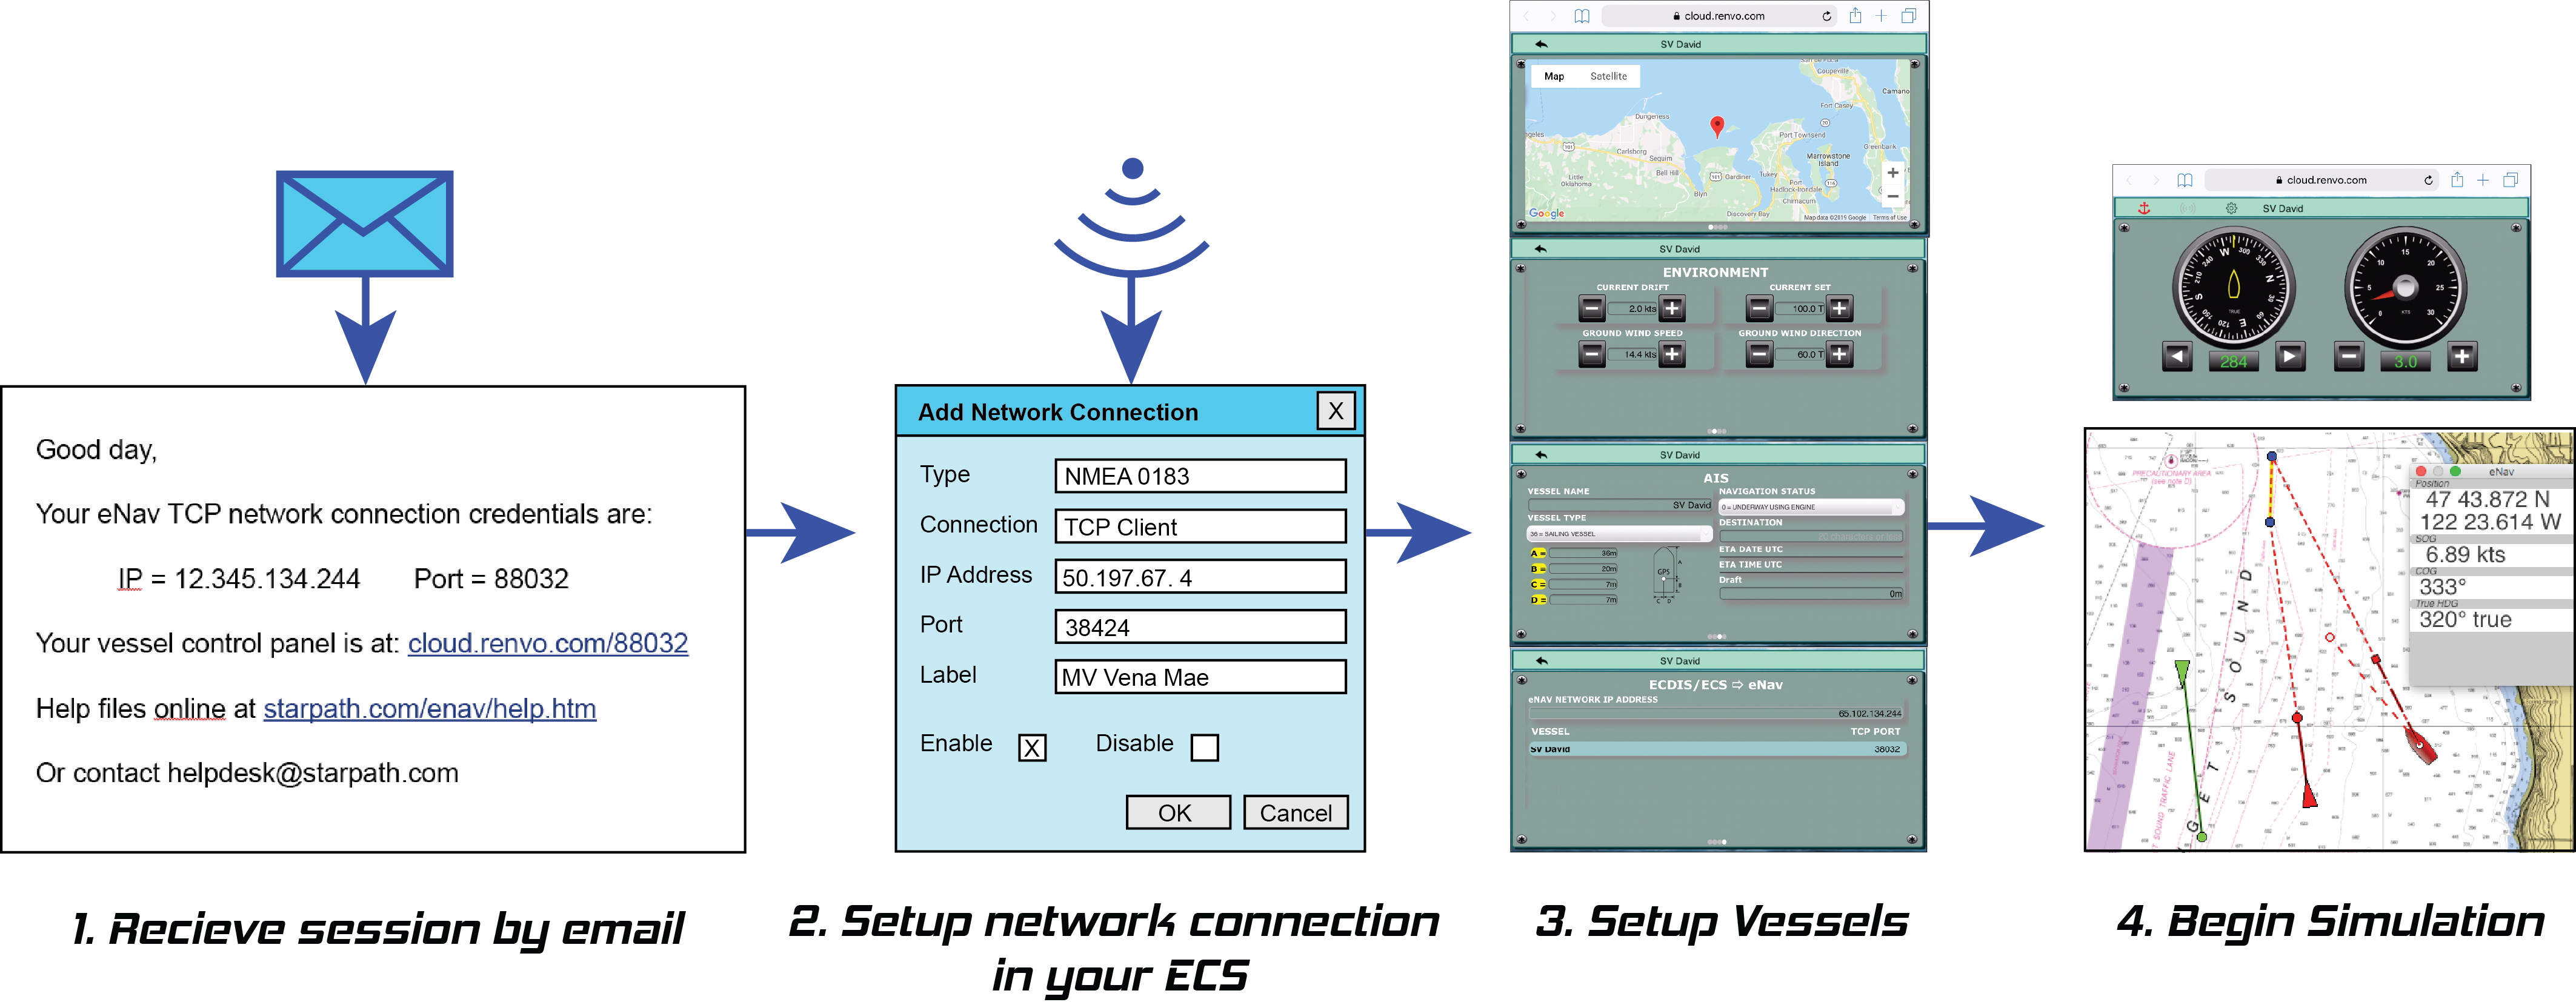
When it becomes available, the eNav simulation service can be purchased at starpath.com/enav. When you first purchase access to the eNav Trainer you will receive a session link by email. Session names default to the user's name, but these can be customized to meet the needs of group users.

Figure 1. Sample email showing links to start the simulation.
The IP and Port are used for setting up the internet connection to your computer, which is done inside your navigation program, as discussed below. When you click the control panel link it will open the control panel in your default web browser. You will need to see this panel to drive your vessel. There are various ways to do this discussed below, including using your phone to view the controls.
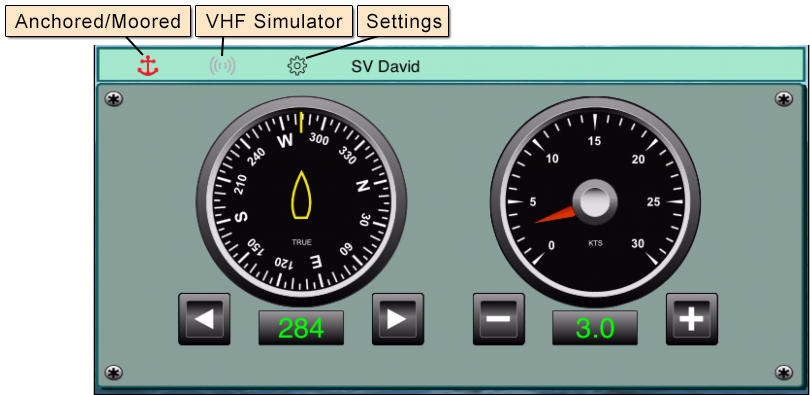
Figure 2. Vessel Control panel, for setting heading and speed, and other setup parameters with the menu items.
There are several ways to start the process. You can skip down to the section on connecting to your ECS and use the IP address and port number in the email, or you can set up your location, AIS output, and environment first. To access these controls, press the gear icon. If you are not connected yet, this icon will alternate between yellow and black. Once connected it stays black.
The gear icons takes you to the first of four setup screens; the one you see first can depend on what you looked at last. You can swipe through them on a touch screen device or use the side arrows. There are four screens: Vessel Assignment, AIS set up, Environment, Initial location.
Settings: Vessel Assignment, Page 1 of 4 [↑]
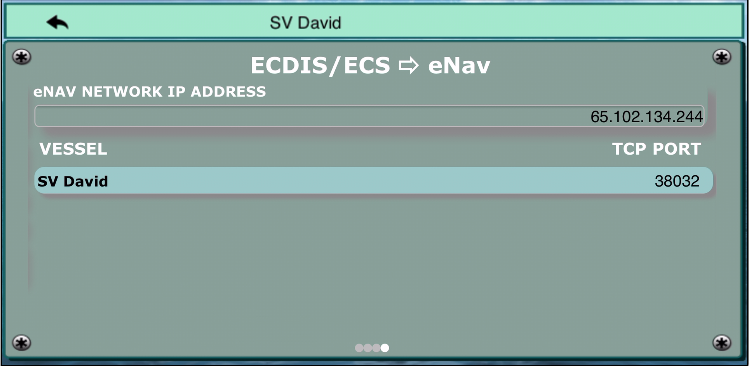
Figure 3. Vessel Assignment page that includes your TCP network connection information and link to vessel controls.
The return arrow in the menubar taes you back to the Control Panel.
This is the same internet connection information that is in your email, but you can find it here if needed during the simulation. Its use is covered in the Connection section below.
Settings: AIS Set-up, Page 2 of 4[↑]
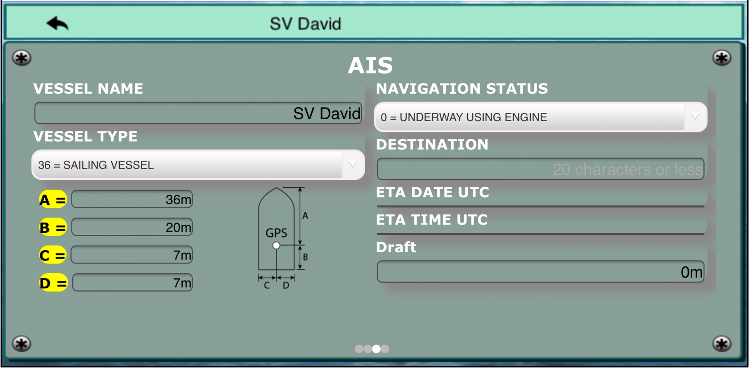
One virtue of the eNav is our rigorous AIS simulation. With multiple vessels in a session, each shows up as an AIS target to the others. In this window you input the AIS parameters for your own vessel. When simulating only one vessel, this data will not be used, so this just shows you the typical input a user must make when setting up an AIS.
When using AIS, it is the operator's responsibility to keep this voyage data up to date, and especially to change from underway to anchored or moored when you end the voyage. The frequency of the AIS broadcasts depends on this status — as often as every 2 seconds when underway at 10 kts or more, compared to every 1 minute when not underway. Thus there is an unnecessary consumption of bandwidth if all the moored vessels are sending out underway signals, and consequently this is a finable offense.
In eNav, when you press the Anchored / Moored icon, it stops your boat, but does not change your AIS navigation status. That is the operator's responsibility. The drop down options for ship type and nav status are shown below.
The location of the GPS on your vessel is also an AIS input parameter. It is specified by the dimensions A,B,C,D as shown below. This is most important for larger vessels when viewing the vessels in the navigation software as real size ship icons, which is an option in the navigation software for large scale settings.
The Destination Name can be plain language (20 characters max) or expressed as UN/LOCODE.
The ETA at the destination is entered in UTC, same as GMT, in two lines. An ETA of 1330 on July 4, 2016 would be entered as 0704 on the mmdd line and then 1330 in the hhmm line.
 |
|
Ship Type
|
Navigation Status
|
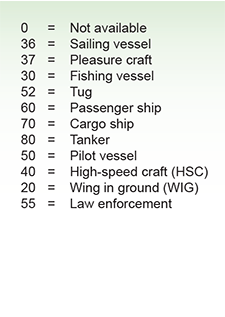
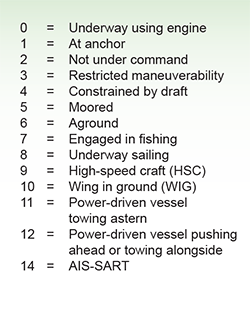
Figure 4. AIS input screen. Vessel dimensions are in meters, with comma separated values on the GPS location.
Vessel type and status are selected from drop down menus.
Settings: Current and Wind, Page 3 or 4 [↑]
The ability to set current onto your vessel is a powerful training feature of eNav. Current is set on each vessel individually, and when present the COG and SOG observed in your navigation program for the true motion of your vessel will differ from the heading and speed you are steering in the control panel. Current drift is the current speed in knots. Current set is the true direction the current flows toward.
Setting up a route in your navigation software with legs in various directions and then following it in the presence of strong current is a fundamental exercise that can be mastered using eNav.
Setting the true wind (sometimes called "ground wind') lets you work with the true and apparent wind displays within your ECS. Use of a custom leeway table is an option, but not part of a standard session.
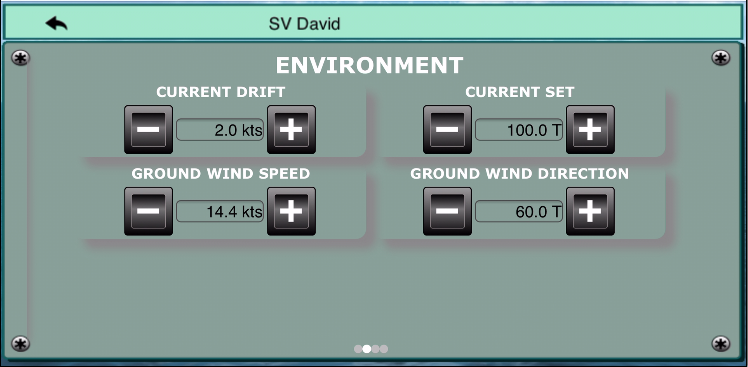
Figure 5. Set true wind and current.
Settings: Initial Location, Page 4 of 4 [↑]
The default starting location will be in or near Puget Sound (Seattle, WA). This can be changed on this screen to any location in the world.
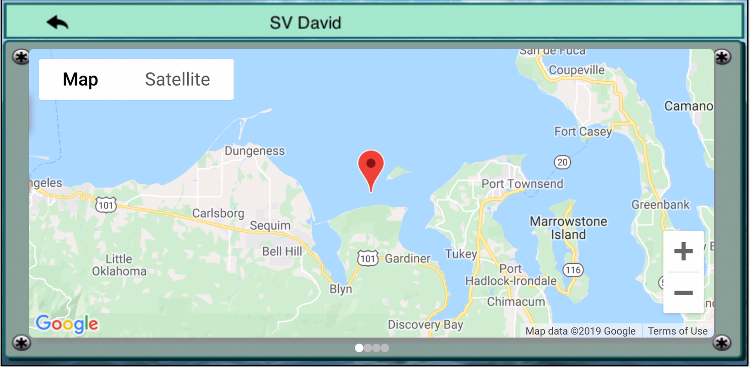
Figure 6. Use this Google Map display to set your initial location.
To position your vessel, zoom out on the map (- key) and pan to find the approximate location you want and click the map. That will set the new location. Then you can zoom in (+key) to fine tune the location, with with another click or by dragging the marker icon to where you want to start. You can pan the screen by dragging the red pointer against a side of the window, which can expedite some positioning. Remember to click after positioning.
Setup Network Connection [↑]
To run the simulation in your navigation software it must first be connected to your system via an Internet connection, called TCP/IP. All programs make the connection in essentially the same way: we find the network setup screen and enter the IP and Port number provided to you by an email link as shown above. Once the connection has been made it will be stored in your navigation program and can then be enabled, disabled, or removed as needed. Further notes on this quick step, with video illustrations using several popular programs is given at Network Connections to Navigation Software.
Anchored or Moored Status [↑]
Since we are sailing in current, when we wish to stop the boat it is not enough to just set the knotmeter speed to zero. We have to wilfully do more to stop it and this is simulated with the anchor icon in the menu. You can use this feature as you choose—to actually stop the boat at the end of a session or mooring exercise, or just stop it to take a break from the navigation practice. This can be turned on and off as you choose. It will set the knotmeter speed to zero, however, so when getting back underway you have to add speed. This function does not affect the vessel heading.
Means the vessel is stopped and not underway. All simulated vessels start in this mode.
Means the vessel is underway, and can be driven from the Control Panel.
Making the Network Connection in Your ECS [↑]
This step is best learned from the videos or from your ECS manual. The process is basically the same for all ECS, but there are different routes to the setup window. After turning on your navigation software, step one is finding which Options or Setup menu includes adding or viewing Data Port Connections, sometimes called Configuring or Setting up Electronics or Ports. From there you select add a new connection, and then choose Network Connection. This will ask for a type of connection, which is TCP, and then ask for an IP address and a Port number, which you will have from an email as shown in Figure 1 above. Normally you will know immediately if it has connected properly, as your ECS will indicate a valid GPS signal. The videos show sample ways that various navigation programs can check the connections for you.
Displaying the Vessel Control Panel [↑]
 |
 |
 |
|
Figure 3. Samples of ECS running eNav Trainer simulated vessels showing several optional ways to display the control panels. You can alternatively load one or more control panels onto a separate desktop and then toggle back and forth between controls desktop and nav program desktop. For some practice it is most convenient to have both controls and chart in view at the same time.
This is an important step for optimizing the use of the simulator. There are multiple ways you can do this to best meet your needs. You can even have several options running simultaneously to learn the best solution. The controls panel runs in a web browser window, so the question reduces to finding a convenient way to view a web browser window at the same time you are viewing your navigation software screen. The controls do not have to be viewed on the same computer used for your navigation software, although that is one of the options. It can be viewed on any computer, or tablet, or phone with a network connection, and the control device does not need to be on the same network as your navigation software. Below are notes on a few options. There are video illustrations of each.
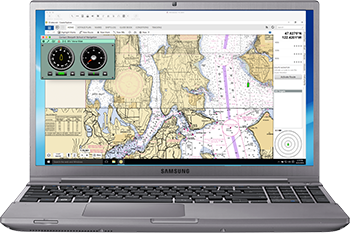
(1) View vessel controls and navigation software on the same computer.
This might be thought of as the most basic solution, but it might not be best for some navigation software. For example, some ECS only accept GPS signals for full navigation functionality in a "navigation mode" display (as opposed to a "planning mode" display), which in turn forces the display to full screen. In this mode, the browser window showing the control panel will be hidden. In most of these ECS with two display modes, however, you have a further option to run navigation mode in a window, which could be positioned on t he screen to show enough of the control panel to click it to bring it to the front for controls, then click the chart to go back to navigation. Alternatively, you can enlarge the navigation window to essentially a full screen that covers the controls, and then switch back and forth to control panel from the links in the task bar. On the other hand, if you prefer the true full screen navigation mode, you can choose a different option for viewing the control panel, as outlined below.
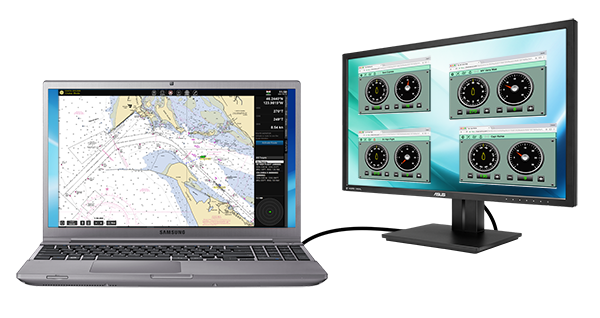
(2) Use of an external monitor.
With just one computer, a user may have on hand a spare monitor, which offers a nice solution. This is even likely these days since screen resolutions have increased so much they often leave us with outdated monitors that have been replaced with larger, higher resolution models. For this application, even an old, small monitor with poor resolution will be more than adequate. Just connect the extra monitor to your laptop or desk computer and display the one or more control panels on it. There will be one control panel for each vessel you are simulating, but only one of these is providing the GPS signals for your ECS.
(3) Use of two desktops on the same computer.
Latest versions of Windows and Mac OS include multiple desktop options. With this option, you can have the chart software running full screen on one desktop and then one or more vessel control panels running on the another desktop. Then you can switch between then for vessel control with keys or task bar links that are always visible. Note that it is not uncommon to have this option for a long time and not know it was on your system!
(4) Two computers.
If you have two computers at hand that are both connected to the Internet, then you can view the simulation in your navigation software in one of them at full screen, and then open the control panel in the other computer.
(5) View control panel in a tablet or smart phone.
Any device that can go online can be used to view the control panel. Just open the control panel link in that device and adjust its size to meet your needs. Tablets (iOS, Android, Windows, or Linux) work fine for this. For cell phones, the larger the screen the better.
One way to get the control panel link into a mobile device or another computer is just to email the link to yourself and then check your mail in the device and open it from there. The email icons in the Vessel Assignment page (above) can be used to send the links to various places.
(6) A convenient hybrid operation.
You can have multiple control panels active for the same vessel at any time. When you change anything on one, that change will be reflected on all of them. Thus you can have one control panel running on your main computer that you use for the initial set up, and then have one control panel on your phone that you just use for speed and heading changes. The setup control panel can then be hid or minimized and not in view when using your navigation software, and only referred to for major changes to your set up, such as adding current or changing AIS status or moving locations. Otherwise it is not in view, and you just drive the boat using the big buttons on your phone.
Videos in the Tutorial section illustrate each of these options.
There are also videos in that section that outline basic training exercises that can be carried out using eNav.
Troubleshooting [↑]
Cell phone display of vessel control panel: In some cellphones, the controls and menus do not work well if you have pinch-zoomed the display. If this is observed, tap or slide the screen to resume normal display.
Lost connection: During a lost Internet connection, moving vessels will continue to move as they were before the connection. A prominent notice will appear on your screen when this happens with a link to reactivate the connection.
Several properties of the simulation are listed here. They are explained individually below.
MMSI. On the left is a fictitious Maritime Mobile Service Identity (MMSI) that has been assigned to your simulated vessel. For a single vessel operation, this number is not used.
Vessel name. Following the MMSI is the temporary name of your vessel. In the set-up window of the control panel (explained below) you assign a vessel name of your choice.
AIS navigation status. For a single vessel operation, the AIS data are not used. You will indeed be transmitting a simulated AIS signal while you practice, but only other simulated vessels can detect it.
ECS monitored. This box will show a check mark once your navigation software is running the simulation. When you close the navigation program the check mark disappears.... but the simulated vessel will carry on as you set it up unless you stop the vessel from the control panel. Looking ahead, if you are in current, just setting the speed to zero will not stop you! Use the Anchored/moored toggle in the menu bar.
TCP connection for ECS. These are the data you will need to set up your navigation software to accept the GPS simulation signals via a network connection. This is covered below.
Links to control vessels. This link opens the control panel used to drive your vessel across the chart. Sessions with multiple vessels, will have multiple lines of data on the Vessel Assignment page.
Action. Click an icon from this column to email the vessel controls of that vessel to another computer or mobile device.