Getting Started with Electronic Chart Navigation
qtVlm Training Mode Install for Windows and Mac Computers
( Instructions for iPhones and iPads )
For electronic chart navigation, we recommend the use of qtVlm, which we describe in the Starpath Glossary. It is state of the art for navigation and weather. It is free for Mac or PC, which are the versions we use in our courses, but there are also mobile versions for iOS and Android. Starpath works closely with qtVlm, but we do not have a financial interest in this product. We recommend it because we believe it is the best suited for learning and mastering electronic chart navigation.
qtVlm, like any sophisticated navigation and weather app, has a lot of configuration options and standard locations for storing charts, tides and current data, weather data, and so. Likewise there are many choices of screen layout, colors, fonts, and more.
To expedite getting started with the training, we have created a way for students to access a "Training Mode" install option that makes the initial set up configuration we recommend, along with providing a set of training charts, US tides and currents, several sample GRIB files to see how weather forecasts work, along with a few other training features. This remains the full version of the program, and users can revert to the default configuration at any time, removing all changes made in the Training Mode.
The training mode is achieved in three steps, which are the same for Mac and PC. Below are instructions followed by video demos of the process.
Step 1. Download the latest version of qtVlm and install it in your desired location. ( Note for Mac users on processor type. )
The default install locations would be for a PC: C:\ProgramFiles\qtVlm and for a Mac: Macintosh HD\Applications\qtVlm. The install process creates a qtVlm folder inside of the folder location you chose. It does not have to be in the default folders mentioned. You can install qtVlm to the desktop if you choose. Wherever you put it, that is the "qtVlm root folder."
On the first run, when asked "Charts are missing, what do you want to do?" Click Download. This installs the base maps. The actual charts are installed automatically in Step 3.
Step 2. You will need to add a small custom file called "training.dat" to the qtVlm root folder. To download training.dat, you must right-click the link (control-click on Mac) and select "Save link as..." ("Download linked file as..." in Safari). This will open a dialog box that allows you to navigate to the qtVlm root folder, and save the file there. If you do not use the option with "as..." it will not work correctly.
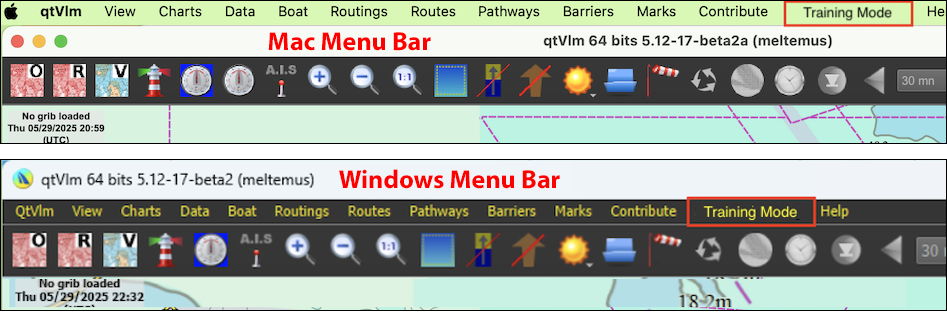
Step 3.Close qtVlm if open, and then reopen the program, and you will see a new item in the menu bar, called "Training Mode." Click that menu item and choose "Download and Activate."
If you have already installed an earlier version, follow Step 1, and just update to the latest version. You can go in and out of the Training Mode without losing changes you have made in either configuration. Here are videos showing the way to prepare your install for the training mode option.
| Install qtVlm on a PC using EDGE | Install qtVlm on a PC using CHROME | Install Training Mode on a PC |
| Install qtVlm and Training Mode on a Mac | Installing qtVlm updates on a Mac |
The training mode versions also work on mobile devices, but our courses concentrate on use of the free computer versions, although we provide tech support on all versions, and the mobile apps function remarkably similar to the computer apps. The mobile versions cost $49 in the App Stores. There are separate instructions for installing training mode on mobile apps.
Resources for Mac and PC
Interactive Cheat Sheet Interactive "How to" instructions for specific tasks
Playlist of tutorial videos (Several on getting started)
Training Mode Overview: What it does and what it contains (22 min video) or Blog Post text version
Demos of all plotting exercises we do in the coastal nav course.
The official Manual This is an extensive, illustrated document that covers some details not in the above sources.
If questions arise, please post them in the Student Discussion Forums.
________________________
History of training packs: training_xx.zip
06: Oct 15, 2025. The basic mode explained in the video above.
07: Feb 26, 2026. Updated to new ENC in the training region, plus new NOAA harmonics.
08: Mar 16, 2026. Updated charts to latest build
09: Apr 01, 2026. Another chart update as NOAA has now completed the scale band 4 set over our training region.
10: July 20, 2026. Fixed a bug that affected charts in the iOS version.